Keras ModelCheckpoint Callback – Yet Another Great One!

This is Part 2 in my short series on Keras Callbacks. As I stated previously, a callback is an object that can perform actions at various stages of training and is specified when the model is trained using model.fit(). They are super helpful and save a lot of lines of code. That's part of the beauty of Keras in general - lots of lines of code saved! Some other callbacks include EarlyStopping, discussed in Part 1 of this series, TensorBoard, and LearningRateScheduler. I'll discuss TensorBoard and LearningRateScheduler in the last 2 parts. For the full list of callbacks, see the Keras Callbacks API documentation. In this post, I will discuss ModelCheckpoint.
The purpose of the ModelCheckpoint callback is exactly what it sounds like. It saves the Keras model, or just the model weights, at some frequency that you determine. Want the model saved every epoch? No problem. Maybe after a certain number of batches? Again, no problem. Want to only keep the best model based on accuracy or loss values? You guessed it - no problem.
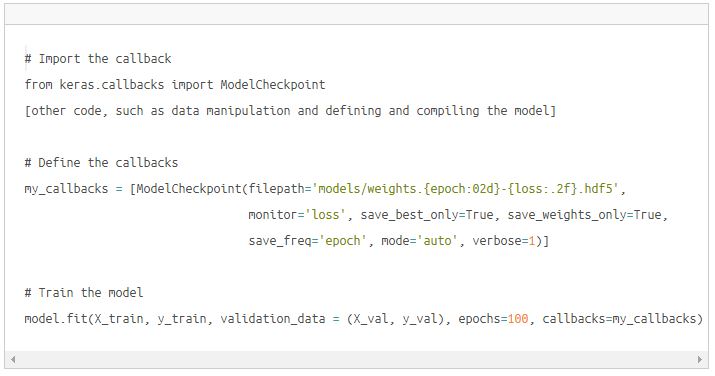
As with other callbacks, you need to define how you want ModelCheckpoint to work and pass those values to model.fit() when you train the model. I'm sure you can read the full documentation on your own, so I'll just give an example from my own work and hit the high points. Here is some example code.

Let's discuss the options above.
- filepath - This can be any name you want. You can literally save every model as a single file named checkpoint.h5 that will be overwritten repeatedly if you want. If you are only saving the best model (based on a metric), this might work, but it does not give you any information about which epoch the model came from or the value of the metric at that point. To make this information actually valuable, formatting can be used in the filepath. In the example above, it will save the epoch number and the loss. You could use val_loss, accuracy, or val_accuracy if you chose.
- monitor - This tells Keras which metric to monitor, such as loss, val_loss, accuracy, or val_accuracy.
- save_best_only - Tells Keras whether or not to save all models or just the best one, again defined by your metric. There are 2 options - True or False. If the value is set to True and you specify it to monitor loss, it will check the loss after every epoch. If the loss went down, then it will save that model. If it didn't go down, it won't save it. If you chose False, it will save the model after every epoch regardless. That may be something you want, but each model has a tendency to be large, so watch your storage space if you are training for a large number of epochs.
- save_weights_only - This tells Keras whether or not to save the full model or just the weights. There are pluses and minuses to both. If save_weights_only is set to True, only the weights are saved, not the model topology. If set to False, it saves the weights as well as the model topology. Again, pluses and minuses. You have to decide which is best for you.
- save_frequency - How often to save the model. In my case, I am using epoch so it saves the model after every epoch, assuming the loss value decreased.
- mode - You can set this to auto, min, or max. Specifying min or max, tells it to evaluate the current version of the metric and and save the model depending on if the metric is less than the minimum or greater than maximum value previously produced. So if you are using accuracy as your metric, you want mode to be max. If loss, then min. I'll share a secret. You can use auto and Keras is smart enough to know that with loss, it should use min and with accuracy it should use max. Go ahead and set it to auto just so you don't end up putting in the wrong value for mode and then have to go back and troubleshoot.
- Finally, verbose - You know what this does.
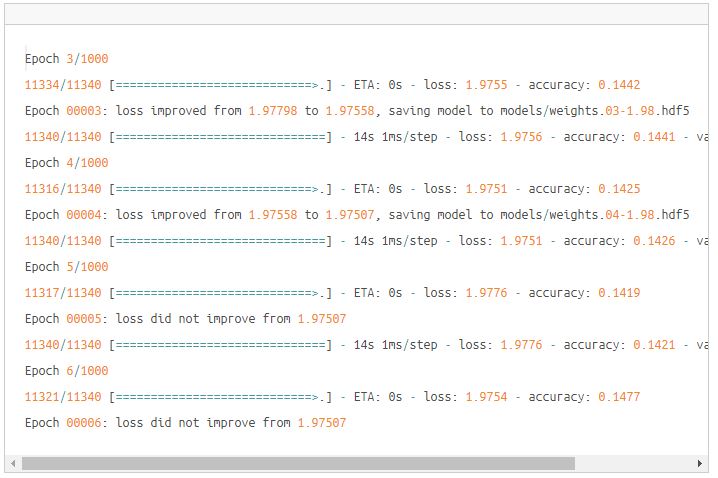
Here is the output from some training I did using the ModelCheckpoint I defined above. In epochs 3 and 4, the loss decreased, so the model weights were saved. In epochs 5 and 6, the loss did not decreased, so the weights were not saved.

Now that we have our weights saved, we can later go back and load them for inference. I won't cover that (although it is simple) for the sake of brevity. Jason Brownlee (@TeachTheMachine) of Machine Learning Mastery has a very good tutorial on how to do it. He always writes great stuff!
